# How to Map a Windows Network Drive to an SMB Shared Folder
A network drive allows a folder stored on a server to be accessed from a Windows Client like a regular local drive.
Example:
Server:
\\SERVER-IP\Company
Client:
X:\
This configuration allows users to access the shared folder through File Explorer without entering the SMB address every time.
## 1. Prerequisites
Make sure the following are available:
- A Windows Server providing the SMB Share.
- A Windows Client connected to the network.
- The SMB Share name.
- A Windows username and password with permission to access the share.
- TCP port 445 is reachable from the client.
Example:
Server:
\\SERVER-IP\Company
User:
SERVER-NAME\username
Network Drive:
X:
Replace SERVER-IP, SERVER-NAME, and username with values from your environment.
## 2. Test SMB connectivity
Open PowerShell on the Windows Client.
Run:
Test-NetConnection SERVER-IP -Port 445
Check the result:
TcpTestSucceeded : True
If the result is True, the client can reach the SMB service on the server.
If False, troubleshoot the network connection, firewall, VPN/Tailscale, routing, or SMB configuration before continuing.
## 3. Test SMB authentication
Before mapping the drive, test the UNC path.
Run:
net use \\SERVER-IP\Company /user:SERVER-NAME\username *
Windows will request the password.
A successful connection displays:
The command completed successfully.
Then test:
dir \\SERVER-IP\Company
If the shared folders are displayed, SMB authentication and connectivity are working.
## 4. Map the shared folder as drive X:
Run:
net use X: \\SERVER-IP\Company /user:SERVER-NAME\username * /persistent:yes
Enter the password when prompted.
A successful mapping displays:
The command completed successfully.
Check the mapping:
net use
The result should show:
OK X: \\SERVER-IP\Company
## 5. Test the network drive
Run:
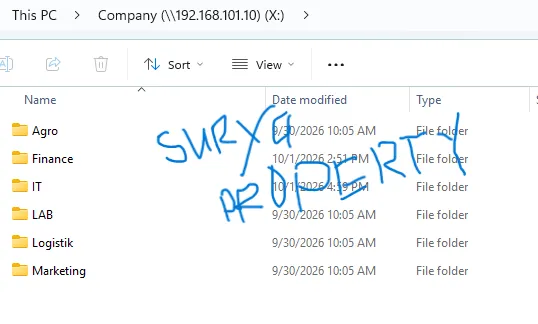
dir X:\
The available folders will be displayed according to the user's permissions.
The drive can also be opened through File Explorer:
X:\
## 6. Why use X:?
A consistent drive letter makes company-wide deployment and documentation easier.
For example:
X: → Company Shared Storage
The structure can then be standardized:
X:\Finance
X:\Logistik
X:\Marketing
X:\IT
X:\LAB
X:\Agro
Mapping the drive does not grant additional permissions. Folder access is still controlled by Windows permissions.
## 7. Remove the mapping
To remove the mapping:
net use X: /delete /y
The mapping can then be recreated using the correct credentials.
## 8. Persistent mapping
The parameter:
/persistent:yes
instructs Windows to maintain the mapping and attempt to reconnect after restart or login.
## 9. Important security considerations
Do not use the Administrator account as a routine operational credential simply because it can access every folder.
Use Windows accounts appropriate to each department or role.
Examples:
Finance → Finance account
Logistics → Logistics account
IT → IT account
Folder access should remain controlled through Windows Groups and NTFS ACLs.
## 10. Conclusion
The network drive mapping process consists of:
1. Verifying TCP port 445 connectivity.
2. Testing SMB authentication.
3. Verifying the UNC path.
4. Creating the X: mapping.
5. Testing folder access.
6. Using /persistent:yes when persistent mapping is required.
This approach allows Windows Server shared storage to be used like a regular drive from Windows Clients.