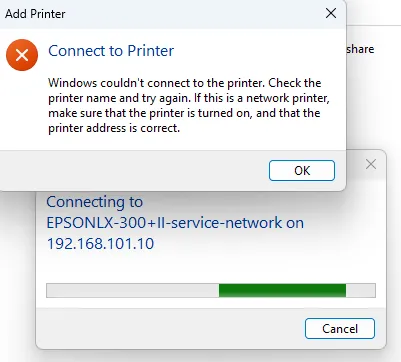
Are you having trouble sharing printers from Windows Server 2019 to client computers, particularly those running Windows 10 or 11 Home Edition? Common errors such as "Windows couldn't connect to the printer" or "Access is denied" are frequently triggered by recent Windows security patches restricting the RPC protocol (PrintNightmare mitigations).
Instead of wasting time modifying the Registry or Group Policy on every new client workstation, there is a standard, robust networking solution: Combining proper Advanced Sharing settings with the LPR (Line Printer Remote) Port method.
Here is the complete step-by-step guide to setting it up from scratch.
STEP 1: Windows Server 2019 Configuration (Server-Side)
Before touching the client computers, we must ensure that the Windows Server is properly configured to host the printer and accept LPR print jobs.
Part A: Enable LPD Service Feature
- Open Server Manager on your Windows Server 2019.
- Click Add roles and features, then click Next until you reach the Features tab.
- Locate and expand the Print and Document Services folder.
- Must Check: LPD Service (Line Printer Daemon Service). This service allows the server to receive print jobs sent via the LPR protocol.
- Click Next, then Install, and wait for the installation to finish.
Part B: Advanced Printer Sharing & Security Permissions Settings
- Go to Control Panel > Devices and Printers on the server.
- Right-click the printer you want to share (e.g., legacy or dot-matrix printers like the Epson LX-300), and select Printer properties.
- Open the Sharing tab, then:
- Check Share this printer.
- Crucial Tip: Change the Share name to something short, clean, and completely free of special characters or plus signs (+). For example:
epsonlx300II-service-network. - Check Render print jobs on client computers.
- Switch to the Security tab to configure access permissions:
- Ensure the Everyone group is listed. If it's missing, click Add, type
Everyone, and click OK. - Click on Everyone, and under the Permissions for Everyone section below, make sure Print is checked under Allow.
- Click Apply and OK to save the configuration.
STEP 2: Configuration on the New Client Workstation
Once the server is configured, you can perform these steps directly on any new client machine (Windows 10 / 11 / Home / Pro) without needing to touch Registry entries or Group Policy workarounds.
Part A: Enable LPR Port Monitor Feature
- Press the
Win + Rkeys on the client's keyboard, typeoptionalfeatures, and press Enter. - The Windows Features dialog box will open.
- Scroll down, locate, and expand the Print and Document Services folder.
- Check the box for LPR Port Monitor.
- Click OK and wait for Windows to finish installing the feature, then click Close.
Part B: Add the Printer via LPR Port Mode
- Press
Win + R, typecontrol printers, and press Enter to open Devices and Printers. - Click Add a printer at the top, then click the blue link The printer that I want isn't listed.
- Select the bottom option: Add a local printer or network printer with manual settings, and click Next.
- Choose Create a new port. In the Type of port dropdown list, select LPR Port, and click Next.
- A new dialog box with two input fields will appear. Fill them out as follows:
- Name or address of server providing lpd: Type your Windows Server's IP address (e.g.,
192.168.1.10). - Name of printer or print queue on that server: Type the exact Share Name you defined on the server (e.g.,
epsonlx300II-service-network).
- Click OK. Windows will bypass the SMB/RPC network security layer and immediately prompt you for the driver.
- In the driver selection window, choose Epson under Manufacturer and select your printer model (or use a built-in generic driver like Epson LX Series 1 (80)), then click Next until you hit Finish.
You're all set! By deploying this LPR Port bypass, your shared printer will completely ignore access restriction bugs, allowing deployment on any new client computer in just minutes.
TROUBLESHOOTING: Printer Driver Is Installed but Does Not Appear in the LPR Driver List
In some cases, especially with legacy printers such as the EPSON LX-300+II, Windows may already have the printer driver installed, but the driver does not appear in the driver selection list when creating a printer using an LPR Port.
This can happen when the driver is still being used by an existing printer connection or an old shared printer.
For example, running:
Get-PrinterDriver |
Where-Object {$_.Name -match "LX|Epson"} |
Format-Table Name,Manufacturer,MajorVersion,DriverPath -AutoSize
may show:
Name         : EPSON LX-300+II ESC/P
Manufacturer : EPSON
MajorVersion : 3
This means Windows still recognizes the driver.
However, when running the official Epson installer again, you may receive:
A shared printer using the same driver is already installed. Uninstall the shared printer and try again.
This usually means that an existing printer is still using the same driver.
A. Find the Printer Using the Driver
Open PowerShell as Administrator and run:
Get-Printer |
Where-Object {$_.DriverName -eq "EPSON LX-300+II ESC/P"} |
Format-List Name,DriverName,PortName,Shared,ShareName
For example:
Name       : \\192.168.x.x\EPSON LX-300+II ESC/P
DriverName : EPSON LX-300+II ESC/P
PortName   : USB002
Shared     : True
ShareName  : EPSON LX-300+II ESCP
A name such as:
\\192.168.x.x\EPSON LX-300+II ESC/P
indicates that the computer still has a connection to a shared printer provided by 192.168.101.51.
If the printer is no longer required, remove it before reinstalling the driver.
B. Remove the Old Shared Printer
Run PowerShell as Administrator:
Remove-Printer -Name "\\192.168.x.x\EPSON LX-300+II ESC/P"
Replace the printer name with the exact value returned by Get-Printer.
Then verify:
Get-Printer |
Where-Object {$_.DriverName -eq "EPSON LX-300+II ESC/P"} |
Format-List Name,DriverName,PortName,Shared,ShareName
If there is no output, the old printer connection has been removed.
C. Remove the Old Driver if Necessary
Check whether the driver is still installed:
Get-PrinterDriver -Name "EPSON LX-300+II ESC/P" |
Format-List Name,Manufacturer,MajorVersion,DriverPath,InfPath
If you need to reinstall the driver, remove the old driver:
Remove-PrinterDriver -Name "EPSON LX-300+II ESC/P"
If Windows reports that the driver is still in use, restart the Print Spooler service:
Restart-Service Spooler
Then try again:
Remove-PrinterDriver -Name "EPSON LX-300+II ESC/P"
Verify the result:
Get-PrinterDriver |
Where-Object {$_.Name -match "LX-300"} |
Format-Table Name,Manufacturer,MajorVersion,DriverPath -AutoSize
Important: Do not remove the driver if another printer is still using it. Always check the installed printers first.
D. Reinstall the EPSON LX-300+II Driver
After removing the old printer connection and, if necessary, the old driver, run the Epson driver installer again.
EPSON LX-300+II Driver:
Download EPSON LX-300+II Driver
After installation, verify the driver:
Get-PrinterDriver |
Where-Object {$_.Name -match "LX-300"} |
Format-List Name,Manufacturer,MajorVersion,DriverPath,InfPath
The expected result should look similar to:
Name         : EPSON LX-300+II ESC/P
Manufacturer : EPSON
MajorVersion : 3
E. If the Driver Still Does Not Appear in the LPR Driver List
It is important to understand that LPR does not transfer the printer driver from the server to the client computer.
LPR only defines the network printing path:
Client
   ↓
LPR Port
   ↓
Windows Server
   ↓
Printer Queue
The printer driver must still be installed and available on the client computer.
Therefore, if EPSON LX-300+II ESC/P does not appear when configuring:
Add Printer
→ Create a new port
→ LPR Port
first verify that the driver is installed on the client:
Get-PrinterDriver |
Where-Object {$_.Name -match "LX-300|Epson"} |
Format-Table Name,Manufacturer,MajorVersion,DriverPath -AutoSize
If EPSON LX-300+II ESC/P is not listed, install the Epson driver first.
Then repeat:
Control Panel
→ Devices and Printers
→ Add a printer
→ The printer that I want isn't listed
→ Add a local printer or network printer with manual settings
→ Create a new port
→ LPR Port
Enter:
Name or address of server providing lpd:
192.168.1.10

Name of printer or print queue on that server:
epsonlx300II-service-network
Replace the server IP address and queue name with your actual configuration.
F. Using Windows Print Server Instead of LPR
If the goal is to make the printer available to multiple client computers, the architecture can be:
Windows Server 2019
       │
       ├── Printer
       │     └── EPSON LX-300+II
       │
       ├── Printer Driver
       │     └── EPSON LX-300+II ESC/P
       │
       └── Shared Printer
             └── epsonlx300II-service-network
                       │
             ┌─────────┼─────────┐
             ↓         ↓         ↓
          Client 1  Client 2  Client 3
With LPR, the driver must still be installed on each client.
With Windows Printer Sharing, clients can connect using:
\\SERVER-NAME\epsonlx300II-service-network
Windows can then use the printer driver provided by the Print Server, subject to the client operating system and its Point and Print security policies.
G. Final Verification
After the printer has been installed, run:
Get-Printer |
Where-Object {$_.DriverName -match "LX-300"} |
Format-Table Name,DriverName,PortName,Shared,ShareName -AutoSize
Example LPR configuration:
Name         DriverName              PortName    Shared
----         ----------              ---------   ------
EPSON LX300  EPSON LX-300+II ESC/P   LPR_LX300   False
Example Windows Shared Printer configuration:
Name                                         DriverName
----                                         ----------
\\192.168.x.x\epsonlx300II-service-network  EPSON LX-300+II ESC/P
This allows you to verify whether the printer is using the correct Epson driver and whether the connection is configured through LPR or Windows Printer Sharing.